segunda-feira, 13 de abril de 2020

How Do I Get Started With Bug Bounty ?

How do I get started with bug bounty hunting? How do I improve my skills?


These are some simple steps that every bug bounty hunter can use to get started and improve their skills:

Learn to make it; then break it!
A major chunk of the hacker's mindset consists of wanting to learn more. In order to really exploit issues and discover further potential vulnerabilities, hackers are encouraged to learn to build what they are targeting. By doing this, there is a greater likelihood that hacker will understand the component being targeted and where most issues appear. For example, when people ask me how to take over a sub-domain, I make sure they understand the Domain Name System (DNS) first and let them set up their own website to play around attempting to "claim" that domain.

Read books. Lots of books.
One way to get better is by reading fellow hunters' and hackers' write-ups. Follow /r/netsec and Twitter for fantastic write-ups ranging from a variety of security-related topics that will not only motivate you but help you improve. For a list of good books to read, please refer to "What books should I read?".

Join discussions and ask questions.
As you may be aware, the information security community is full of interesting discussions ranging from breaches to surveillance, and further. The bug bounty community consists of hunters, security analysts, and platform staff helping one and another get better at what they do. There are two very popular bug bounty forums: Bug Bounty Forum and Bug Bounty World.

Participate in open source projects; learn to code.
Go to https://github.com/explore or https://gitlab.com/explore/projects and pick a project to contribute to. By doing so you will improve your general coding and communication skills. On top of that, read https://learnpythonthehardway.org/ and https://linuxjourney.com/.

Help others. If you can teach it, you have mastered it.
Once you discover something new and believe others would benefit from learning about your discovery, publish a write-up about it. Not only will you help others, you will learn to really master the topic because you can actually explain it properly.

Smile when you get feedback and use it to your advantage.
The bug bounty community is full of people wanting to help others so do not be surprised if someone gives you some constructive feedback about your work. Learn from your mistakes and in doing so use it to your advantage. I have a little physical notebook where I keep track of the little things that I learnt during the day and the feedback that people gave me.


Learn to approach a target.
The first step when approaching a target is always going to be reconnaissance — preliminary gathering of information about the target. If the target is a web application, start by browsing around like a normal user and get to know the website's purpose. Then you can start enumerating endpoints such as sub-domains, ports and web paths.

A woodsman was once asked, "What would you do if you had just five minutes to chop down a tree?" He answered, "I would spend the first two and a half minutes sharpening my axe."
As you progress, you will start to notice patterns and find yourself refining your hunting methodology. You will probably also start automating a lot of the repetitive tasks.

More info


  1. Hacker Tools
  2. Hacking Tools Github
  3. Hack Tools Download
  4. Hacking Tools And Software
  5. Hacking Tools For Pc
  6. Hack Tools Pc
  7. Hacker Techniques Tools And Incident Handling
  8. Hacking Tools For Windows Free Download
  9. Hacks And Tools
  10. Nsa Hack Tools
  11. Hacking Tools Windows 10
  12. Pentest Reporting Tools
  13. Underground Hacker Sites
  14. Hacking Tools Mac
  15. Hacker Tools Software
  16. Pentest Tools Alternative
  17. Pentest Tools
  18. Hack Tool Apk No Root
  19. Tools Used For Hacking
  20. Hacking Tools 2019
  21. Hacking Tools Pc
  22. Tools For Hacker
  23. Pentest Tools Free
  24. Hacking Tools For Games
  25. Github Hacking Tools
  26. Pentest Tools Review
  27. New Hacker Tools
  28. Hacker Tools Linux
  29. Hak5 Tools

Discover: A Custom Bash Scripts Used To Perform Pentesting Tasks With Metasploit


About discover: discover is a custom bash scripts used to automate various penetration testing tasks including recon, scanning, parsing, and creating malicious payloads and listeners with Metasploit Framework. For use with Kali Linux, Parrot Security OS and the Penetration Testers Framework (PTF).

About authors:


discover Installation and Updating


About RECON in discover
   Domain

RECON

1. Passive

2. Active
3. Import names into an existing recon-ng workspace
4. Previous menu

   Passive uses ARIN, dnsrecon, goofile, goog-mail, goohost, theHarvester, Metasploit Framework, URLCrazy, Whois, multiple websites, and recon-ng.

   Active uses dnsrecon, WAF00W, traceroute, Whatweb, and recon-ng.
   [*] Acquire API keys for Bing, Builtwith, Fullcontact, GitHub, Google, Hashes, Hunter, SecurityTrails, and Shodan for maximum results with recon-ng and theHarvester.

API key locations:

recon-ng
   show keys
   keys add bing_api <value>

theHarvester
   /opt/theHarvester/api-keys.yaml

   Person: Combines info from multiple websites.

RECON

First name:

Last name:

   Parse salesforce: Gather names and positions into a clean list.

Create a free account at salesforce (https://connect.data.com/login).
Perform a search on your target company > select the company name > see all.
Copy the results into a new file.

Enter the location of your list:

About SCANNING in discover
   Generate target list: Use different tools to create a target list including Angry IP Scanner, arp-scan, netdiscover and nmap pingsweep.

SCANNING

1. Local area network
2. NetBIOS
3. netdiscover
4. Ping sweep
5. Previous menu


   CIDR, List, IP, Range, or URL

Type of scan:

1. External

2. Internal
3. Previous menu

  • External scan will set the nmap source port to 53 and the max-rrt-timeout to 1500ms.
  • Internal scan will set the nmap source port to 88 and the max-rrt-timeout to 500ms.
  • Nmap is used to perform host discovery, port scanning, service enumeration and OS identification.
  • Matching nmap scripts are used for additional enumeration.
  • Addition tools: enum4linux, smbclient, and ike-scan.
  • Matching Metasploit auxiliary modules are also leveraged.

About WEB in discover
   Insecure direct object reference

Using Burp, authenticate to a site, map & Spider, then log out.
Target > Site map > select the URL > right click > Copy URLs in this host.

Paste the results into a new file.


Enter the location of your file:

   Open multiple tabs in Firefox

Open multiple tabs in Firefox with:

1. List

2. Directories from robots.txt.
3. Previous menu

  • Use a list containing IPs and/or URLs.
  • Use wget to pull a domain's robot.txt file, then open all of the directories.

   Nikto

Run multiple instances of Nikto in parallel.

1. List of IPs.
2. List of IP:port.
3. Previous menu

   SSL: Use sslscan and sslyze to check for SSL/TLS certificate issues.

Check for SSL certificate issues.

Enter the location of your list:


About MISC in discover
   Parse XML

Parse XML to CSV.

1. Burp (Base64)

2. Nessus (.nessus)
3. Nexpose (XML 2.0)
4. Nmap
5. Qualys
6. revious menu

   Generate a malicious payload

Malicious Payloads

1. android/meterpreter/reverse_tcp
2. cmd/windows/reverse_powershell
3. java/jsp_shell_reverse_tcp (Linux)
4. java/jsp_shell_reverse_tcp (Windows)
5. linux/x64/meterpreter_reverse_https
6. linux/x64/meterpreter_reverse_tcp
7. linux/x64/shell/reverse_tcp
8. osx/x64/meterpreter_reverse_https
9. osx/x64/meterpreter_reverse_tcp
10. php/meterpreter/reverse_tcp
11. python/meterpreter_reverse_https 12. python/meterpreter_reverse_tcp
13. windows/x64/meterpreter_reverse_https
14. windows/x64/meterpreter_reverse_tcp
15. Previous menu

   Start a Metasploit listener

Metasploit Listeners

1. android/meterpreter/reverse_tcp
2. cmd/windows/reverse_powershell
3. java/jsp_shell_reverse_tcp
4. linux/x64/meterpreter_reverse_https
5. linux/x64/meterpreter_reverse_tcp
6. linux/x64/shell/reverse_tcp
7. osx/x64/meterpreter_reverse_https
8. osx/x64/meterpreter_reverse_tcp
9. php/meterpreter/reverse_tcp
10. python/meterpreter_reverse_https
11. python/meterpreter_reverse_tcp
12. windows/x64/meterpreter_reverse_https
13. windows/x64/meterpreter_reverse_tcp
14. Previous menu


Related posts
  1. Pentest Tools For Windows
  2. Nsa Hacker Tools
  3. Hack Tool Apk
  4. Pentest Tools Subdomain
  5. Pentest Tools Github
  6. Hacker Tools Online
  7. Best Pentesting Tools 2018
  8. Hack Tool Apk
  9. Hack Tools For Pc
  10. Hackers Toolbox
  11. Game Hacking
  12. Hack Tools Download
  13. Hack Tools
  14. Hack Tools Github
  15. Ethical Hacker Tools
  16. Pentest Tools Linux
  17. Pentest Tools Apk
  18. Pentest Tools Linux
  19. Beginner Hacker Tools
  20. Hacking Tools For Games
  21. Hacking Tools For Games
  22. Pentest Tools For Windows
  23. New Hack Tools
  24. Hacker Techniques Tools And Incident Handling
  25. Hacker Tools For Pc

HACKING GMAIL FOR FREE CUSTOM DOMAIN EMAIL

hacking-gmail-for-free-custom-domain-email


HACKING GMAIL FOR FREE CUSTOM DOMAIN EMAIL

When it comes to email providers, there's no competitor to Google's awesome features. It is efficient which connects seamlessly with the rest of your Google products such as YouTube, Drive, has a major application called Gmail Inbox, and is overall an extremely powerful email service. However, to use it with a custom domain, you need to purchase Google Apps for either $5 or $10/month, which for casual users is a bit unnecessary. On top of that, you don't even get all of the features a personal account gets, e.g. Inbox. So, here's a free way to use your Gmail account with a custom domain. I am just going to show you hacking Gmail for free custom domain email.

SO, HOW HACKING GMAIL FOR FREE CUSTOM DOMAIN EMAIL

PASSWORD: EHT

STEPS:

  • First, register with Mailgun using your Gmail address. Use your Gmail only. Once you have clicked the confirm link, log in to the Mailgun website. Now you're in the dashboard, move on the right under "Custom Domains", click "Add Domain".
  • Follow the setup instructions and set DNS records with whoever manages your DNS. Once you've done this, click on the "Routes" link on the top to set up email forwarding.
  • Now move to the Route tab and click on Create New Route.
  • As you click the button, you will see a page like below. Just enter the information as entered in the following screenshot.
  • Just replace the quoted email with your desired email in the above-given screenshot.
  • Next, we'll setup SMTP configuration so we would be able to send emails from an actual server. Go to "Domains" tab, click on your domain name.
  • On this page, click "Manage your SMTP credentials" then "New SMTP Credential" on the next page.
  • Type in the desired SMTP credentials. And, go to Gmail settings and click "Add another email address you own". Once you open, enter the email address you wish to send from.
  • In the next step, set the SMTP settings as follows.
  • After clicking "Add Account" button, now you're done.
  • The final step, make sure to set it to default email in the Gmail settings > Accounts.
That's all. Now you got free Gmail custom domain with 10,000 emails per month. Hope it will work for you. If you find any issue, just comment below.


Note: Use Virtual Machine and scan on VirusTotal before downloading any program on Host Machine for your privacy.

More info


Linux Command Line Hackery Series - Part 6


Welcome back to Linux Command Line Hackery series, I hope you've enjoyed this series so far and would have learned something (at least a bit). Today we're going to get into user management, that is we are going to learn commands that will help us add and remove users and groups. So bring it on...

Before we get into adding new users to our system lets first talk about a command that will be useful if you are a non-root user.

Command: sudo
Syntax: sudo [options] command
Description: sudo allows a permitted user to execute a command as a superuser or another user.

Since the commands to follow need root privileges, if you are not root then don't forget to prefix these commands with sudo command. And yes you'll need to enter the root password in order to execute any command with sudo as root.

Command: useradd
Syntax: useradd [options] username
Description: this command is used for creating new user but is kinda old school.
Lets try to add a new user to our box.
[Note: I'm performing these commands as root user, you'll need root privileges to add a new user to your box. If you aren't root then you can try these commands by prefixing the sudo command at the very beginning of these command like this sudo useradd joe. You'll be prompted for your root password, enter it and you're good to go]

useradd joe

To verify that this command has really added a user to our box we can look at three files that store a users data on a Linux box, which are:

/etc/passwd -> this file stores information about a user separated by colons in this manner, first is login name, then in past there used to be an encrypted password hash at the second place however since the password hashes were moved to shadow file now it has a cross (x) there, then there is user id, after it is the user's group id, following it is a comment field, then the next field contains users home directory, and at last is the login shell of the user.

/etc/group  -> this file stores information about groups, that is id of the group and to which group an user belongs.

/etc/shadow -> this file stores the encrypted password of users.

Using our command line techniques we learned so far lets check out these files and verify if our user has been created:

cat /etc/passwd /etc/group /etc/shadow | grep joe


In the above screenshot you can notice an ! in the /etc/shadow, this means the password of this user has not been set yet. That means we have to set the password of user joe manually, lets do just that.

Command: passwd
Syntax: passwd [options] [username]
Description: this command is used to change the password of user accounts.
Note that this command needs root privileges. So if you are not root then prefix this command with sudo.

passwd joe


After typing this command, you'll be prompted password and then for verifying your password. The password won't show up on the terminal.
Now joe's account is up and running with a password.

The useradd command is a old school command, lets create a new user with a different command which is kinda interactive.

Command: adduser
Syntax: adduser [options] user
Description: adduser command adds a user to the system. It is more friendly front-end to the useradd command.

So lets create a new user with adduser.

adduser jane


as seen in the image it prompts for password, full name and many other things and thus is easy to use.

OK now we know how to create a user its time to create a group which is very easy.

Command: addgroup
Syntax: addgroup [options] groupname
Description: This command is used to create a new group or add an existing user to an existing group.

We create a new group like this

addgroup grownups


So now we have a group called grownups, you can verify it by looking at /etc/group file.
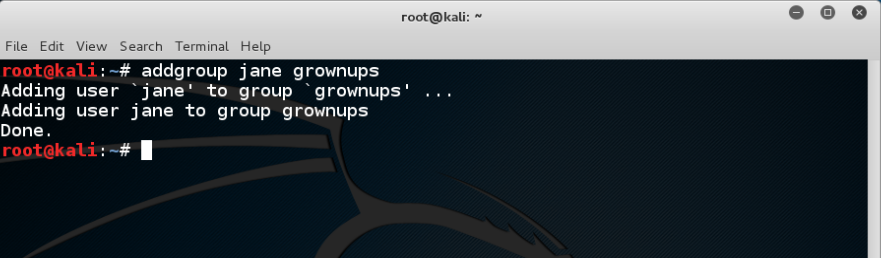
Since joe is not a grownup user yet but jane is we'll add jane to grownups group like this:

addgroup jane grownups


Now jane is the member of grownups.

Its time to learn how to remove a user from our system and how to remove a group from the system, lets get straight to that.

Command: deluser
Syntax: deluser [options] username
Description: remove a user from system.

Lets remove joe from our system

deluser joe

Yes its as easy as that. But remember by default deluser will remove the user without removing the home directory or any other files owned by the user. Removing the home directory can be achieved by using the --remove-home option.

deluser jane --remove-home

Also the --remove-all-files option removes all the files from the system owned by the user (better watch-out). And to create a backup of all the files before deleting use the --backup option.

We don't need grownups group so lets remove it.

Command: delgroup
Syntax: delgroup [options] groupname
Description: remove a group from the system.

To remove grownups group just type:

delgroup grownups


That's it for today hope you got something in your head.

Related posts


Entropy: Netwave And GoAhead IP Webcams Exploiting Tool


About Entropy Toolkit
   Entropy Toolkit is:
  • A set of tools to exploit Netwave and GoAhead IP Webcams.
  • A powerful toolkit for webcams penetration testing.

Entropy Toolkit's installationEntropy Toolkit's execution

Entropy Toolkit's examples:
  • Example of exploiting a single webcam
    entropy -b 1 -i [webcam's ip address and port] -v
    Example: entropy -b 1 -i 192.168.1.100:80 -v
  • Example of exploiting webcams from a list
    entropy -b 2 -l [file text] -v
    Example: entropy -b 2 -l iplist.txt -v
  • Example of exploiting webcams using shodan
    entropy -b 2 -v --shodan [you shodan api key]
    Example: entropy -b 2 -v --shodan PSKINdQe1GyxGgecYz2191H2JoS9qvgD

Entropy Toolkit disclaimer:
   Usage of the Entropy Toolkit for attacking targets without prior mutual consent is illegal. It is the end user's responsibility to obey all applicable local, state, federal, and international laws. Developers assume no liability and are not responsible for any misuse or damage caused by this program.

Entropy Toolkit license: MIT license.

Download Entropy Toolkit
(Sign up Windscribe for free, get full protection and stay anonymous
with the best free VPN. Read more here)

More info


RFCrack Release - A Software Defined Radio Attack Tool

RFCrack uses the following hardware with RFCat libraries:
YardStick One: 
https://goo.gl/wd88sr

I decided to cleanup my RF testing harness and release it as a tool named RFCrack
Mostly because it has been pain to set up use-case scenarios from scratch for every device I am testing. Rather then release a tool no one knows how to use. The below video will be a quick but comprehensive tutorial to get you started If you've been following the blogs, this will greatly simplify your testing, in the following ways:
  • RFCrack handles all of your data conversions. 
  • It allows you to capture, replay and save payloads for use anytime 
  • It will handle rolling code bypass attacks on your devices. 
  • You can jam frequencies and fuzz specific values 
  • It will also allow you to scan specific frequencies in discovery mode or incrementally probe them 
  • RFCrack will hopefully have keyless entry & engine bypass support in the near future

This is the first release, everything works as intended but there will be plenty of updates as I continue to do research and find reasons to add features needed for testing. I am still making changes and making it more flexible with modifiable values and restructuring code.  If you have any legitimate use case scenarios or need a specific value to be modifiable, hit me up and I will do my best to update between research, if its a legitimate use case.

You can reach me at:
Twitter: @Ficti0n
http://cclabs.io , http://consolecowboys.com

GitHub Code for RFCrack:

https://github.com/cclabsInc/RFCrack

Full RF Hacking Course in Development:

Not all of the attacks in the tool have been covered in the RF hacking blog series and a few more are in research mode, as such, not yet added to the tool but will probably be covered in a full length online class on Hacking with RF which includes all targets and equipment.  Send an email to info(at)cclabs.io if your interested.


Walkthrough Training Video:


Until Next time: 

Cheers, and enjoy the tool for your personal use testing devices, feedback and bug reports are appreciated.  I have another RF blog coming out shortly based on my friends research into hacking garages/gates and creating keyfobs.  I will post when its ready. 

Related articles